
SchoolKonnect User Manual: School Setup and Guides by Role
Set up your school in ten steps, then find the everyday tasks for each role: owner, principal, accountant, front office, exams, HR, library, transport, teachers, parents and students.
About this manual
This manual covers two jobs: setting up a new school in SchoolKonnect, and using it day to day in each role. Screens, tabs and buttons are named exactly as they appear in the app.
What you see depends on two things:
- Your role's permissions. Each school builds roles from a fixed list of about 90 permissions, such as Collect fees or Publish exam results. A menu item appears only if your role holds its permission.
- The school's modules. The school turns modules on or off in School Settings → Modules & plan. When a module is off, its menu items are hidden for everyone.
Every school starts with three roles: Owner (everything), Teacher and Parent. The other roles in this manual (Principal, Accountant, Front Office, Exam Coordinator, HR & Payroll, Librarian, Transport Manager and Student) are typical roles a school creates under School Settings → Roles & users → Add Role. The menus listed for each role are typical; your school may give its roles more or fewer permissions.
Signing in
- Go to your school's own address: <your-school>.schoolkonnect.com. The school is identified by the address, so there is no school field to fill in.
- Enter your Username and Password, then click Sign in.
- If the school issued your password, you are asked to change it straight away. Fill in Current password, New password and Confirm new password, then click Save password. The new password must be at least 8 characters and must not be a date of birth.
Usernames by type of account:
| Account | Username | First password |
|---|---|---|
| Staff | Set by the school administrator | Given by the school administrator |
| Teacher | Your staff code | Given by the school administrator |
| Parent | Any of your children's admission numbers | Given by the school |
| Student | Set by the school administrator | Given by the school administrator |
After sign-in, staff land on the Dashboard (teachers on My Teaching), parents on the parent portal and students on the student portal.
Forgotten your password? If the school has an email provider set up, enter your username and click Email me a link. The link works once and expires after an hour. Otherwise the school office resets your password under School Settings → Roles & users → Reset password.
After several wrong passwords, sign-in is paused for a few minutes. An idle session expires; sign in again to carry on where you left off. On a shared computer, always click Sign out when you finish. Signing out in one tab signs you out of all of them.
Finding your way
The menu on the left is grouped by the work: Dashboard, Admissions & Students, Classes & Academics, Attendance & Exams, Fees & Accounts, Staff & HR, Front Office, Transport, Library, Communication, Documents and Reports. Configuration sits apart under School Settings, and Help & Support is at the bottom for everyone.
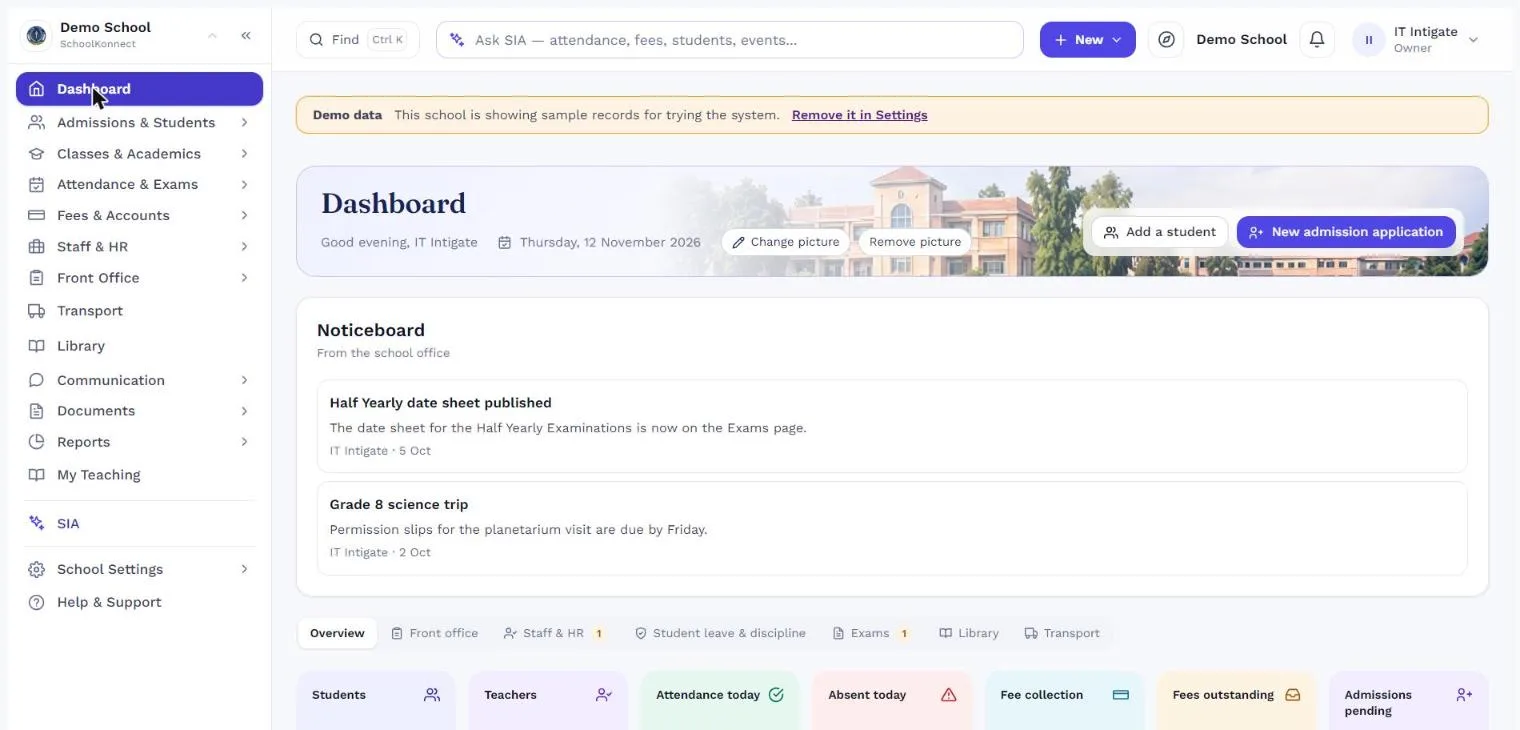
- The order follows your work. Teachers see My Teaching first, accountants Fees & Accounts, the front desk Front Office.
- Find (Ctrl+K). Type a page or a job (fees, homework, collect) or a name, admission number, class or payment reference. Results come back as Actions, Pages and Records.
- New. The button in the top bar lists the jobs your role does most, such as Collect a fee payment or Add a student.
- The Dashboard. The day's figures in one row of tiles (students, teachers, attendance, absences, fee collection, fees outstanding, admissions pending), then today's schedule beside Needs attention, then cards for students, admissions, attendance, fee payments and announcements. You only see the tiles and cards your role and the school's modules allow.
- Ask SIA. Type a question in the Ask SIA bar at the top, for example who is absent today?, fees collected this month or defaulters above 20K. SIA answers from the school's records, using your permissions, and links to the page where you can act.
- On a phone, the bar at the bottom holds Home, your three main groups and Ask; the menu button at the top opens the full menu.
Guided tours are short walk-throughs that highlight the real buttons on the real pages, one step at a time. Open your name at the top right and choose Help & Guided Tours to see the tours for your role, or click the compass button in the top bar to tour the page you are on. You can also ask SIA, for example How do I mark attendance?, and it offers the matching tour. Finished tours show as Completed on any device you sign in on.
School setup
A new school is ready for daily use after ten setup steps, done in this order. Each step needs the ones before it: classes need an academic year, exams need subjects mapped to classes, and fee invoices need students. Everything is done by the Owner from School Settings and the module pages.
Step 0: Get the school created
On the sign-in page, click New school? Request access and fill in the school name, the address you want, your contact details and the first administrator's login. The SchoolKonnect team approves the request and emails you when the school is ready. Alternatively, we create the school for you and send the Owner login.
Either way, you get a school at <your-school>.schoolkonnect.com, an Owner login, the Teacher and Parent roles, and every module switched on. The address cannot be changed later.
Step 1: School profile and modules
- Sign in as the Owner and change the first password when prompted.
- Go to School Settings → School profile & branding. Set the school name, logo, favicon and home page picture.
- Go to School Settings → Modules & plan and turn off any modules the school will not use. A module that is off is hidden from every menu, and its pages and data are refused, for parents as well as staff.
Step 2: Academic year
- Go to School Settings → Academic years → Add Academic Year. Enter the start date, end date and session, written as
2026-27. - Click Make current.
- Set the school's Weekly off days. Attendance cannot be marked on them.
At year end, Close & Promote moves students up a class. It needs the next academic year to exist already (see Year-end under the School Admin role).
Step 3: Subjects, classes and sections
- Go to Classes & Academics → Classes & subjects → Subjects and click Add Subject for each subject.
- On the Classes & Sections tab, click Add Class. Enter the class name, session and, optionally, a capacity.
- Click Add Section for each section. When a class has sections, capacity is set on each section.
- Open each class's Subjects and tick the subjects it studies. These load automatically when you create an exam.
Classes appear in the school's own order everywhere. Change it with the arrows in the Order column.
Step 4: Staff and teachers
- Go to Staff & HR → Designations & departments and add your departments and designations.
- Go to School Settings → Employees → Add Employee for non-teaching staff.
- Go to Staff & HR → Teachers to add teachers. Each teacher needs at least one subject.
- Go to School Settings → Roles & users. Under Teachers without a login, click Create logins for all. Each username is the teacher's staff code; note the first password, which is shown once.
Step 5: Roles and staff logins
- Go to School Settings → Roles & users → Add Role for each role, such as Principal or Accountant, and tick its permissions. Roles that can change settings are marked High privilege.
- Click Add User. Enter the username, display name, optional email, password and role. Link the user to a teacher or a student where relevant.
Step 6: Students and parents
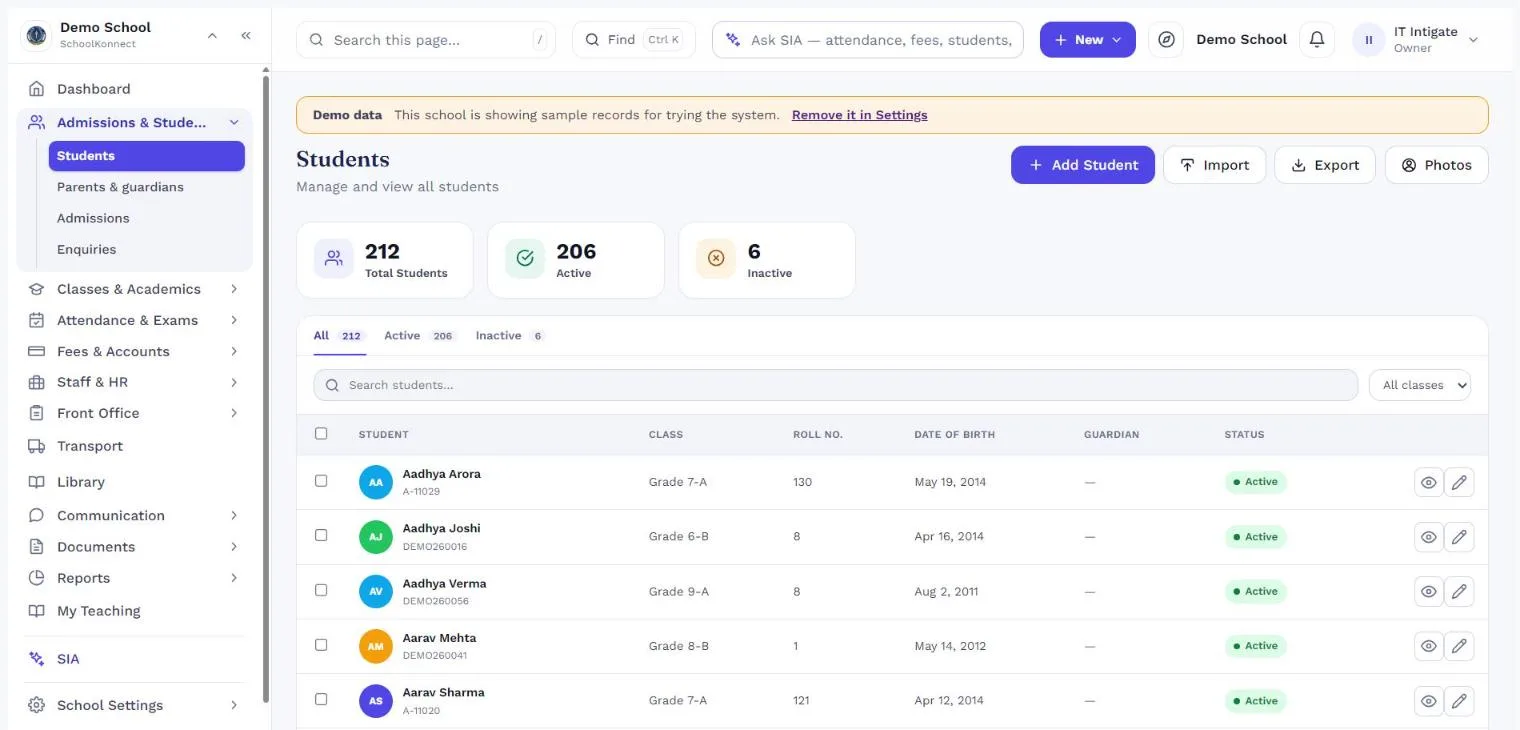
- Go to Admissions & Students → Students. Click Add Student, or click Import to bring in a spreadsheet: Upload, then Validate & Review, then Import. The import needs AdmissionNo, FirstName, LastName and ClassLabel.
- Each student needs a date of birth and at least one guardian with a phone number.
- Parent logins are created automatically for students with a linked parent and a date of birth. To create any that are missing, go to Parents & guardians → Parent app logins, click Preview, then Create logins.
Step 7: Fees
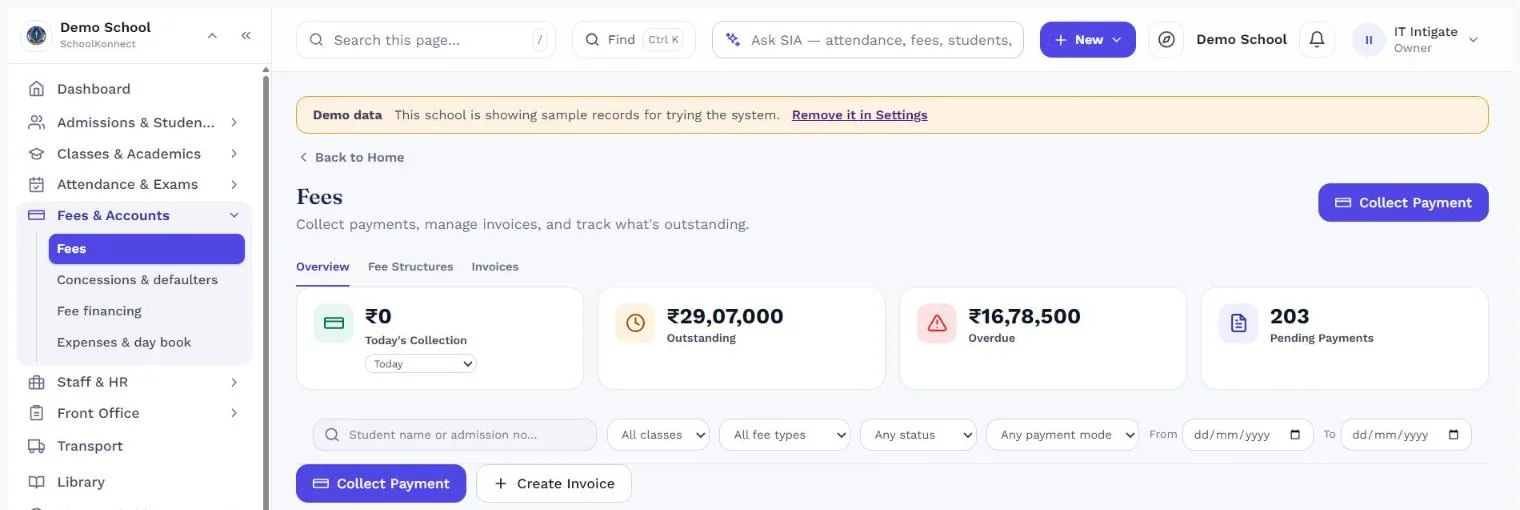
- Go to Fees & Accounts → Fees → Fee Structures → Add Fee Structure. Enter the class, section, session, term, fee type, amount, due date and tenure (Yearly, Monthly or Quarterly).
- Click Generate Invoice to bill students against the structure.
- Under Fees & Accounts → Concessions & defaulters, set up concessions and late-fee rules.
Step 8: Timetable
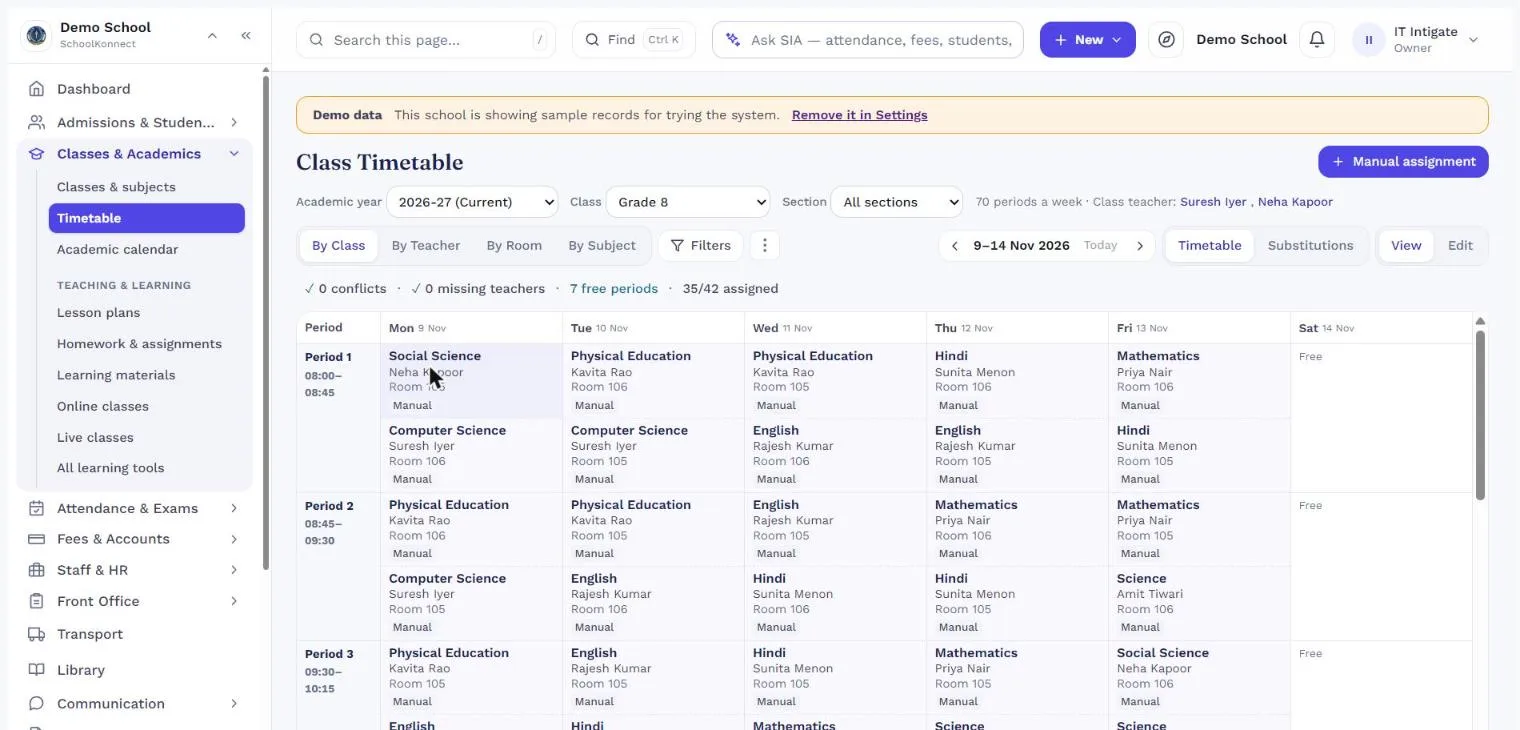
- Open Classes & Academics → Timetable and click Edit.
- Set up the bell schedule (periods and breaks), then assign a subject and teacher to each period.
- Click Validate, then Publish. If there are warnings, publishing needs a reason.
Step 9: Exams and report cards
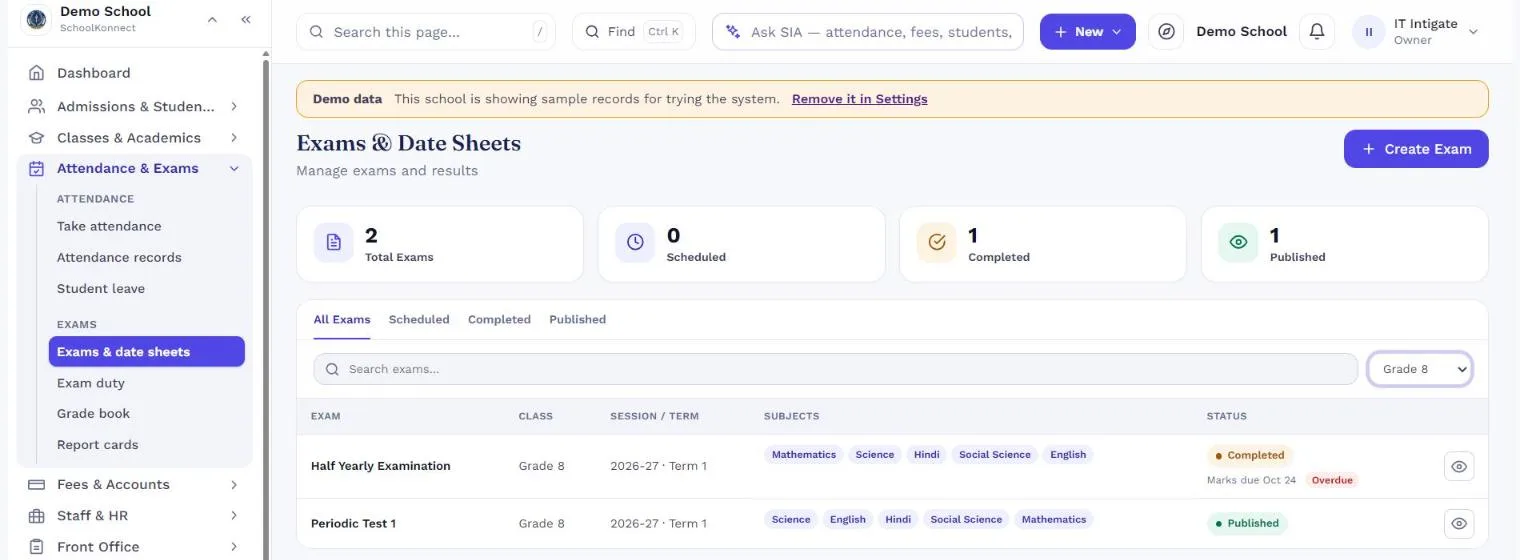
- Set the grading scales in Attendance & Exams → Grade book.
- Set up the report card template under Report Cards.
- Create exams once each class has its subjects mapped (Step 3).
Step 10: Optional modules and integrations
- Transport: add routes with stops, then buses, then trips, then riders, then billing.
- Library: click Add Book for each title.
- Messaging & payments: go to School Settings → Messaging & payments → Add a provider for SMS, WhatsApp, email and the payment gateway, then click Test connection for each. Without an email provider, nobody can reset their own password; without a payment provider, parents cannot pay online.
To try SchoolKonnect before entering real data, use School Settings → Demo data → Load demo data on an empty school. Remove demo data clears it again.
School Admin (Owner)
The Owner runs the school's setup and holds every permission. The Owner role cannot be deleted or renamed, and a school always keeps at least one user who can administer it.
Menu: every group, including School Settings (School profile & branding, Roles & users, Academic years, Employees, Integrations, Messaging & payments, Document & print settings, Audit trail, Modules & plan, Data check, Demo data).
Add a staff user
- Go to School Settings → Roles & users → Add User.
- Enter the username, display name, email (optional) and password (at least 8 characters).
- Pick a role. For a teacher, set the Teacher Link; for a student, the Student Link.
- Save, and give the user their username and first password.
Create or change a role
- Go to School Settings → Roles & users → Add Role, or open an existing role from the Roles table.
- Name the role and tick its permissions. They are grouped by area.
- Save. Users holding the role get the new menu the next time they load the app.
Reset someone's password: in the Users table, click Reset password on their row. They must change it at their next sign-in.
Disable a login: click Disable on the user's row. You cannot disable your own account or change your own role.
Turn a module on or off: go to School Settings → Modules & plan and click Enable or Turn off. The change applies immediately, everywhere, including the parent portal and SIA's answers.
Year-end: go to School Settings → Academic years, add next year, then click Close & Promote on the current year. For each class and section, choose where it moves to; the next class is suggested. Class strength is checked after everyone has moved, and children outside their new class's age range are listed by name so you can keep them back or confirm the move.
Check data quality: School Settings → Data check lists records with problems and links to where each one is fixed.
Review activity: Audit trail records who changed what and when, including logins created, roles changed and payments reversed.
Design certificates, letters and ID cards
- Go to Documents → Templates and click New design. Choose what it will produce, such as a bonafide certificate.
- Start from blank, import your existing certificate or letterhead as the background, or copy an existing design.
- Build the page from the left panel: elements (headings, text, shapes, tables), fields filled from the record (name, class, date of birth, document number, QR verification code), uploads (logo, signature, seal) and layers.
- Click Preview to see it filled in for a real student, then Save. Each save is a new version, and earlier versions can be brought back.
Principal
The Principal sees every area of the school and signs off results and leave, but does not change settings or money.
Menu: Dashboard; Admissions & Students; Classes & Academics; Attendance & Exams; Fees & Accounts (view only); Staff & HR; Transport; Library; Communication; Documents; Reports; and the Audit trail.
Publish exam results
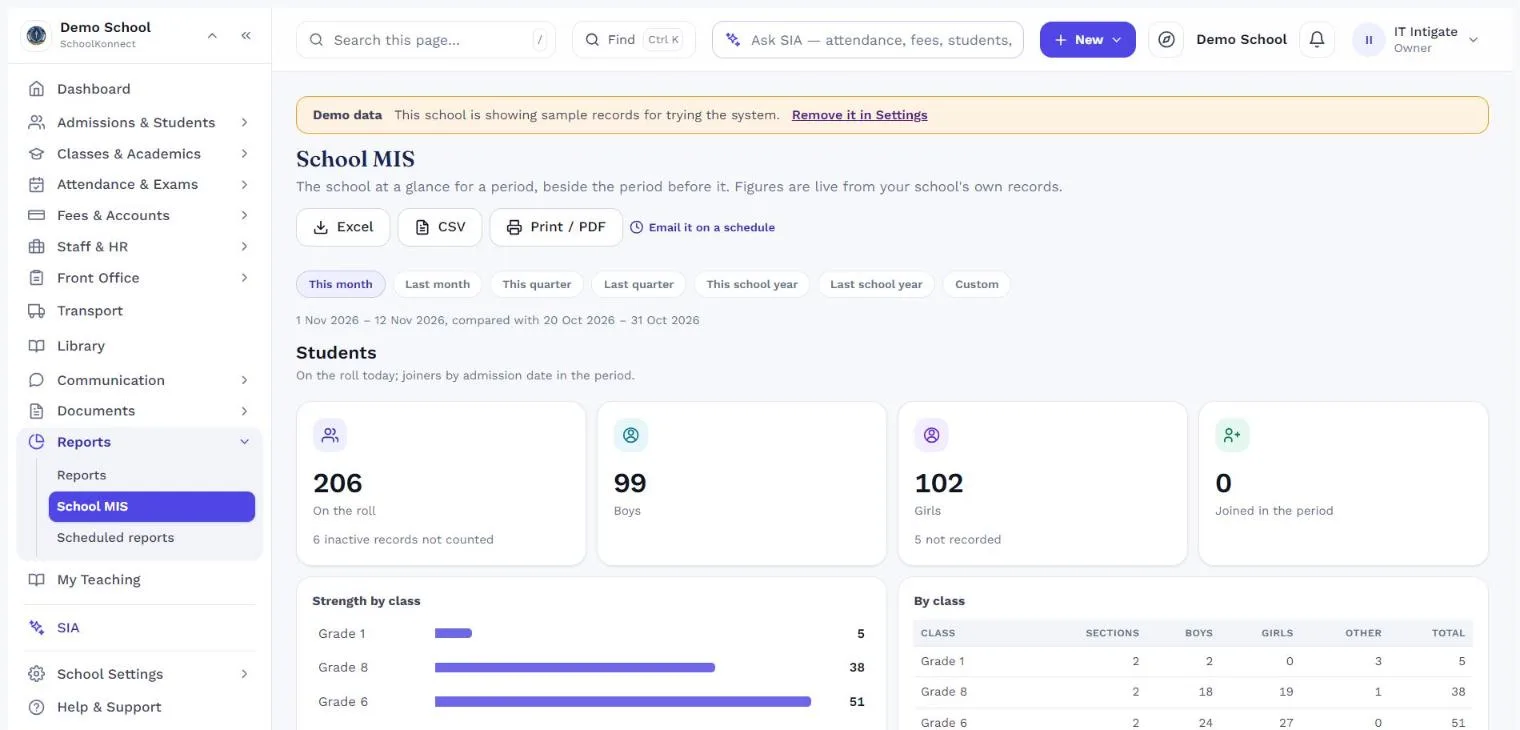
- Go to Attendance & Exams → Exams & date sheets and open the exam.
- Check that every subject's marks are entered and the exam is marked completed.
- Click Publish Results. After publishing, marks are locked and parents and students can see the results.
Publish report cards: go to Report Cards, pick the class and term, then click Publish. Unpublish withdraws them for corrections.
Approve staff leave: go to Staff & HR → Staff attendance & leave → Leave and click Approve or Reject on each request.
Student leave: go to Attendance & Exams → Student leave. Click Record leave to log one yourself, or Refuse to turn a request down.
Send a school-wide message
- Go to Communication → Announcements & messages → New Message.
- Pick the audience: everyone, a class, a section or one student.
- Set the priority (Normal, Important or Urgent). Tick Needs acknowledgement if parents must confirm they have read it.
- Click Send. Read receipts appear on the message.
School calendar: go to Classes & Academics → Academic calendar → Add entry to add holidays and events. Attendance cannot be marked on a holiday.
Reports: go to Reports and pick Fee Collection, Attendance, Exam Performance or Admissions Funnel, with a date range.
Accountant
The Accountant sets fees, bills students, collects payments and follows up on dues.
Menu: Dashboard; Fees & Accounts (Fees, Concessions & defaulters); Reports; Admissions & Students; Classes & Academics; and Documents.
Fee permissions are split three ways: Collect fees takes payments, Manage fees sets fee structures and discounts, and Refund fees reverses payments and deletes invoices. A cashier might hold only Collect.
Set up a fee structure
- Go to Fees & Accounts → Fees → Fee Structures → Add Fee Structure.
- Pick the class, section, session and term.
- Enter the fee type, amount and due date, and pick the tenure: Yearly, Monthly or Quarterly.
- Save.
Bill students: click Generate Invoice, then pick the structure and the students or class. The invoices appear on the Invoices tab.
Collect a payment
- Click Collect Payment and find the student by name or admission number.
- Pick the invoice, then enter the amount and payment mode.
- Save. A receipt is generated and can be printed.
A payment cannot be more than the outstanding balance.
Give a discount: open the invoice and click Adjust Discount.
Reverse a payment: open the invoice, click Reverse… on the payment and give a reason. A payment can only be reversed once. An invoice can be deleted only when no payments are recorded against it.
Concessions: go to Concessions & defaulters → Concessions → Add a concession, for example a sibling or staff-ward discount, then Grant it to a student or Revoke it.
Late fees: on the Late fees tab, set the bands (days overdue and the charge for each), click Save rules, then Charge late fees to apply them to overdue invoices.
Follow up on dues: the Defaulters tab lists overdue students. After calling or messaging a family, click Record a reminder.
Today's collection: Fees → Overview shows today's takings and the totals outstanding. For a date range, use Reports → Fee Collection.
Front Office
Front Office runs the front desk (visitors, early pick-ups, items left for children, enquiries and post), takes admissions, keeps student and parent records up to date, and prints certificates and ID cards.
Menu: Dashboard; Front Office (Visitor log, Early leave, Item hand-over, Postal log); Admissions & Students (Students, Parents & guardians, Admissions, Enquiries); Attendance (records and student leave); Fees (view only); Communication; and Documents (Documents, Print queue, ID cards).
Take a new admission
- Go to Admissions & Students → Admissions → New Application.
- Work through Student Info, Guardian Info, Academic Info, Documents and Review.
- Click Submit application.
An application moves from Submitted to Start review, then Approve or Reject, then Admit. Admit creates the student and the parent login; hand the family their login details.
Add a student directly: go to Students → Add Student. A date of birth and a guardian phone number are required. When a class or section is full, the form says so.
Bulk import: go to Students → Import, then Upload, Validate & Review and Import. Fix the rows it flags before importing.
Student record: open a student to see their full profile. From there you can link a parent, set up a student login, file and verify documents, and review class changes. A child's only guardian cannot be unlinked; link another guardian first.
Certificates and letters: go to Documents → Create document, pick a template and the student, then generate. Print from the Print queue. Each document carries a verification link anyone can check online.
ID cards: go to ID Cards, pick Student, Teacher or Staff, then Generate and Print. Each card's QR code is used for QR attendance.
Check in a visitor
- Go to Front Office → Visitor log and click Check in visitor.
- Enter the name, mobile number and purpose. For ID proof, note only the type and its last 4 characters; the full number is never stored.
- Click Check in, or Check in & print pass.
Still inside lists everyone not yet checked out. Click Check out when they leave.
Early leave (a child going home early)
- A family can ask in the parent app; the request appears under Waiting for a decision. Click Approve, or Refuse with a reason the family will see.
- When a parent asks at the desk or by phone, click Record early leave and choose the student, day, time, reason and who will collect.
- When the collector arrives, click Release and check them against the name shown. If someone else is collecting, tick Collected by someone else and type their name.
- The family is told at once who collected the child and when, and the class register shows Left early. Click Gate pass to print a pass for the guard.
Item hand-over: items a family says they will drop off show as Expected; click Mark received when they arrive, and Given to child once the child has them. Use Record item for items left without notice.
Enquiries
- Go to Admissions & Students → Enquiries → New enquiry. Enter the name, mobile, topic and source; for an admission enquiry, add the child and the class sought.
- Due today lists enquiries whose follow-up date has come. Add a follow-up note and set the next date.
- Close an enquiry with a note when it is done, or Convert to admission to open an application with the details already filled in.
Postal log: go to Front Office → Postal log → Record post, choose Inward or Outward, and enter the date, sender or recipient, item, how it came and the tracking number.
Exam Coordinator
The Exam Coordinator schedules exams, assigns invigilators, gets marks entered and publishes results and report cards.
Menu: Dashboard; Attendance & Exams (Exams & date sheets, Exam duty, Grade book, Report cards); Classes & Academics; Students; Teachers; Communication; and Reports.
Create an exam
- Go to Attendance & Exams → Exams & date sheets → Create Exam.
- Enter the exam name, class, session and term.
- Under Subjects & Date Sheet, the class's subjects load automatically. Set each one's maximum marks, pass marks and date.
- Save. The exam starts as a draft.
To reuse a layout, use Copy from…, Apply to classes… or Templates… on the exam's composition page.
Assign invigilators: go to Exam Duty → Add sitting and pick the exam, date, room and teacher. Teachers see their duties when they sign in.
Enter marks: open the exam, click Enter Marks, pick the subject, type the marks and click Save Marks. Teachers can also enter marks for their own classes from their phones.
Finish and publish: when every subject is in, click Mark Completed, then Publish Results. Once published, marks are locked and families can see them.
Grading scales: set the grade bands in Attendance & Exams → Grade book, for example A1 for 91–100.
Report cards: go to Report Cards, pick the class and term, click Generate Report Cards, check a few, then click Publish.
Exam analysis: go to Reports → Exam Performance for class and subject results.
HR & Payroll
HR & Payroll keeps staff records, runs the staff attendance register, handles leave, and pays salaries each month.
Menu: Dashboard; Staff & HR (Teachers, Office & support staff, Staff attendance & leave, Salaries); Attendance records; Academic calendar; and Communication.
Daily staff register
- Go to Staff & HR → Staff attendance & leave → Register.
- Click All present, then change anyone who is absent, late or on half-day.
- Click Save register.
Leave: on the Leave tab, click Approve or Reject on each request. Set each person's yearly allowance under Leave Quotas.
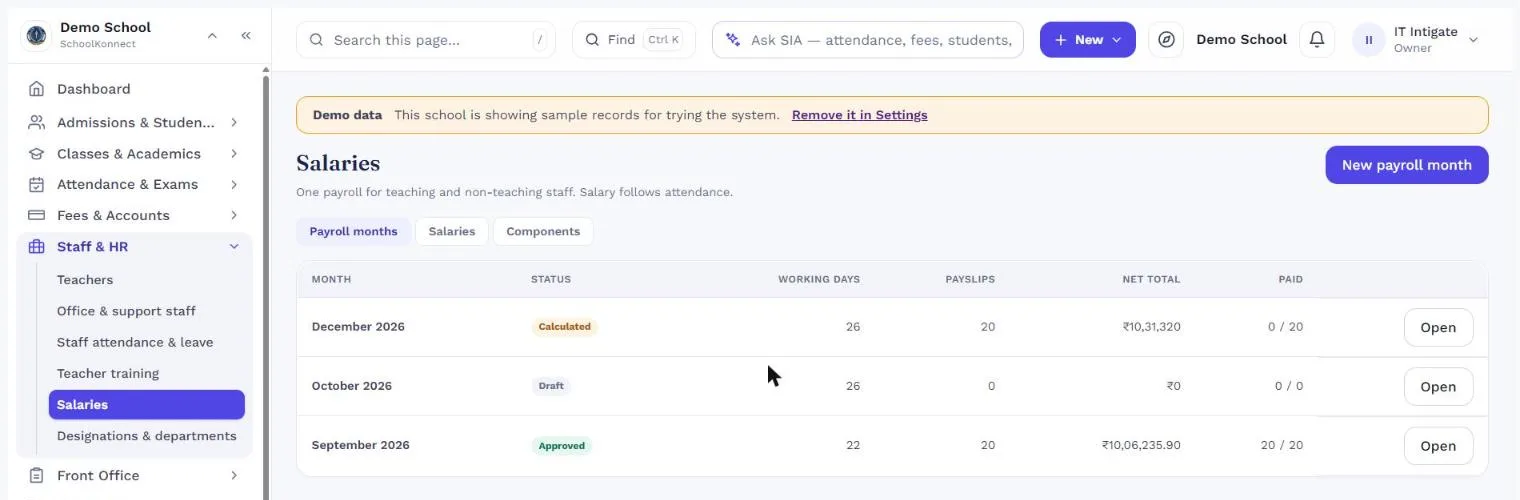
Set salaries: go to Staff & HR → Salaries → Components → Add component to define earnings and deductions, such as Basic, HRA and PF. Then click Set a salary for each staff member.
Monthly payroll
- Click New payroll month.
- Click Calculate. If you change attendance afterwards, click Recalculate.
- Click Approve once the month has ended. If staff attendance has gaps, mark the missing days and recalculate, or approve with an override and a reason.
- After paying the bank, click Mark paid.
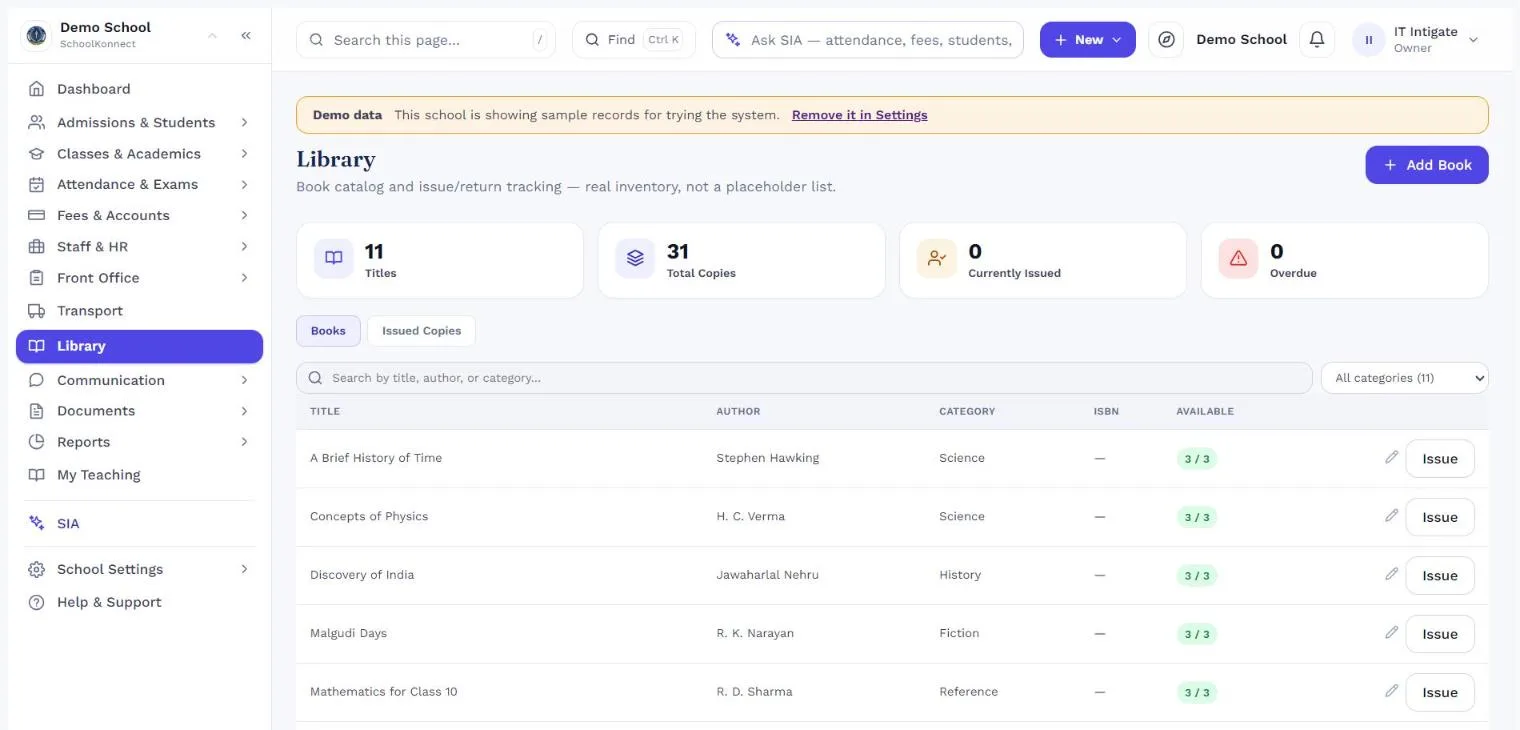
Librarian
The Librarian keeps the book catalogue and issues and returns copies.
Add a book: go to Library → Books → Add Book and enter the title, author, ISBN and number of copies.
Issue a book: click Issue Book, pick the book and the borrower (a student or a teacher), set the due date and save. If every copy is out, the app says so.
Return a book: on the Issued Copies tab, find the copy and click Return. Overdue copies are listed there too.
Transport Manager
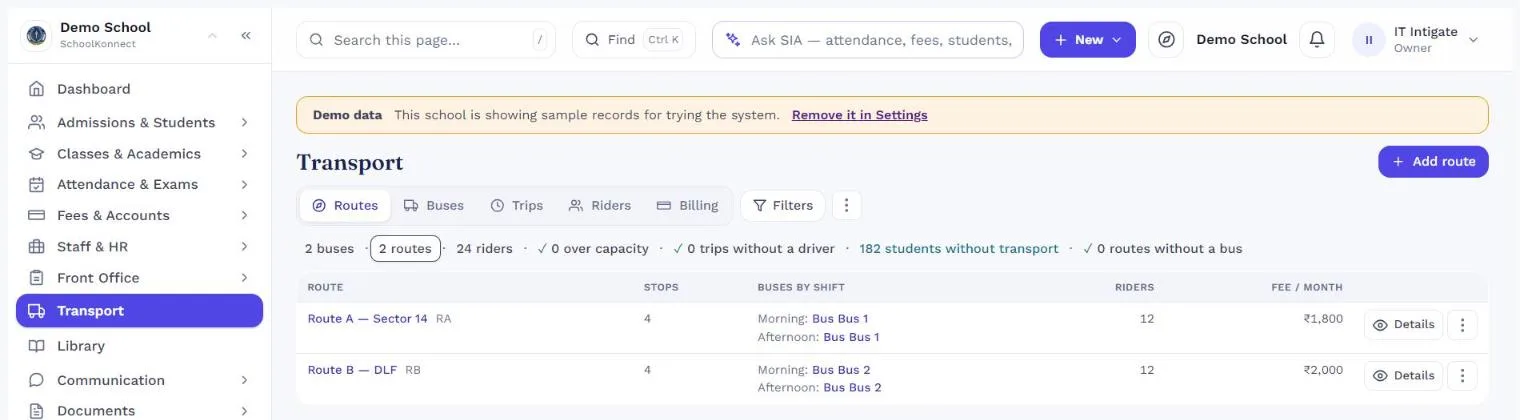
The Transport Manager runs routes, buses and riders, and bills transport fees. Set transport up in the tab order:
- Routes → Add route. Name the route and add its stops in order.
- Buses → Add bus. Enter the registration number, capacity, driver and phone.
- Trips. Choose which bus runs each route, morning and afternoon.
- Riders → Assign student. Pick the student, route and stop. The summary shows how many students still have no transport.
- Billing. Visible to roles that also hold fee permissions. Click Preview, then Generate invoices; transport invoices sit in Fees alongside tuition.
Parents see their child's route and stop in the parent portal.
Teacher
Teachers work from My Teaching, which shows their day, their classes and their students. They can only act on their own classes. A teacher's username is their staff code.
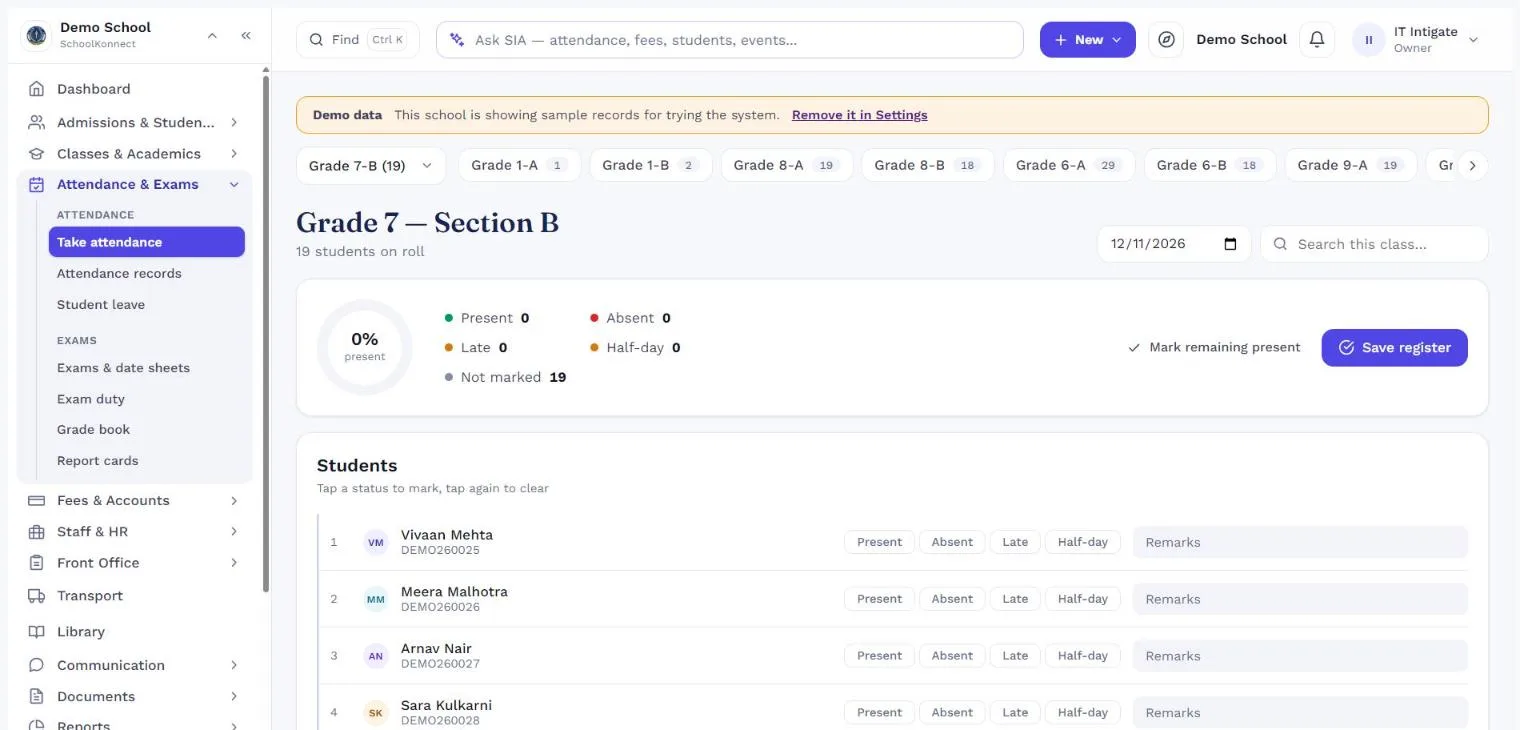
My Teaching tabs: Today, Timetable, My students, Student leave and Report remarks. Today opens with a to-do list of what is still outstanding: attendance not taken, class diary not written, homework to publish. Click Open on any line to go straight to it.
Take attendance
- On Today, click Take attendance, or open the class from My Teaching.
- Click Mark All Present, then change anyone who is Absent, Late or Half-day.
- Click Save Attendance.
Future dates, holidays and weekly off days cannot be marked. To mark by ID card, use Mark by QR, then Open camera. A child collected early through the front office shows Left early with the time.
Class diary: in the class, click Add Entry to note what was covered, then Publish Diary so parents and students can read it.
Homework: in the class, write the homework and click Publish. Students see it under My Work and hand it in there.
Report card remarks: on the Report remarks tab, write a remark for each student before report cards are generated.
Apply for leave: click Apply Leave, pick the type (Casual, Sick, Earned or Other) and the dates.
Exam duty: Exam Duty lists your invigilation sittings.
Parent
Parents use the parent portal to follow their children's attendance, results, homework and fees.
Signing in: go to the school's address. Your username is any of your children's admission numbers, and the school gives you a first password, which you change at first sign-in.
Menu: Home, Messages, Learning, Results, Attendance & Fees, and Pick-up & items.
Switch child: if you have more than one child at the school, pick the child under Viewing at the top.
- Home: today's attendance, upcoming events, announcements, timetable and transport.
- Messages: messages from the school. If a message asks for acknowledgement, confirm you have read it.
- Learning: homework, the class diary and courses.
- Results: published exam results and report cards. They appear only after the school publishes them.
- Attendance & Fees: the attendance record, invoices, payments and the balance due. If the school has a payment gateway, pay online here.
Pick-up & items: to collect your child early, choose the day, give the reason and who will collect, and click Send request. You see when it is approved, and you are notified the moment your child leaves, with who collected them. Under Leave something at the desk, tell the school you are dropping something off, and you see when it reaches the desk and when your child has it.
If the portal shows No children linked yet, ask the school office to link you to your child.
Student
Students use the student portal to see their work, hand in homework, and follow their exams and progress. The school creates each student's login from the student's record.
Menu: Home, Messages, My Work, Exams and My Progress.
- Home: today's timetable and announcements.
- My Work: assignments, classes, courses and the diary.
- Exams: the date sheet and published results.
- My Progress: progress over the year.
Hand in homework: go to My Work → Assignments, open the assignment, attach your work or type your answer, and click Hand in.
Troubleshooting
Most messages point to a rule the school relies on, and tell you what to fix:
| You see | Why | What to do |
|---|---|---|
| A menu item is missing | Your role lacks the permission, or the module is off | Ask the Owner to check your role or Modules & plan |
| Invalid username or password | Wrong password | Wait a few minutes, or ask the office for a reset |
| Date of birth is required. | Students and applicants need a date of birth | Enter it; it is also needed for the parent login |
| A phone number is refused | Phone format | Digits only, 10 to 13, no spaces or letters |
| This is the child's only linked guardian… | A child must keep one guardian | Link another guardian first, then unlink |
| Class … is full | Capacity reached | Pick another section, or ask the Owner to raise the limit |
| You can't mark attendance for a future date. | "Today" is the school's date in India time | Mark today or earlier |
| …is a holiday or …is a weekly off day | The calendar blocks attendance | Remove the holiday if it was added by mistake |
| Payment … exceeds the outstanding balance | Overpayment | Collect the balance shown |
| Cannot delete — payments have already been recorded | The invoice has payments | Reverse the payments first |
| Marks can't be changed once an exam is published. | Results are locked | Ask the Owner how to correct it |
| Staff attendance for the month is incomplete | Register gaps before payroll | Fill the days and recalculate, or approve with an override |
| A closed academic year cannot be edited. | The year is closed | Reopen it in School Settings → Academic years |
| No copies of this book are currently available. | All copies are issued | Wait for a return |
| Your session has expired. | Idle too long | Sign in again; you return to the same page |
Why can't a parent see results? Results show only after Publish Results, and report cards only after Publish.
Where does a parent login come from? It is created automatically when a student has a linked parent and a date of birth, or when an application is admitted.
Need more help? Use Help & Support and the guided tours in the app, or email hello@schoolkonnect.com, Monday to Friday, 10:00 AM to 7:30 PM IST.